
Hi guys, Josh Bowmar here from Bowmar Bowhunting and Bowmar Archery!
I get asked all the time to show how we edit our hunting photos. Today, I am going to do a little step-by-step tutorial on how we edit our photos using just our phone! Everything I am going to show is FREE!
The app we use to edit photos is called Snapseed.
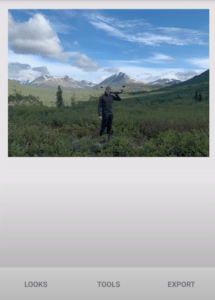
This is the photo that I will be using as my example today. This picture is pretty good already, but my goal is to pull out some colors and details.
Step 1: Click ‘Tools’ -> Click ‘HDR Scape’
You will get a ton of options that come up and they can be very overwhelming. After you hit HDR Scape, a few options will come up. These options add a filter to your photo. I chose the option ‘people’. After you click ‘people’ you can lessen or strengthen the filter by dragging your finger back and forth on the screen.
Step 2: Click ‘details’
I wanted to add more detail to the mountains in the background. Once you click details, you will have two options – structure and sharpening. Structure pulls out a lot of details, making sure all edges in the photo are crisp. Structure added a little too much detail for my liking. Let’s say I want to add structure just to the mountains. Click ‘Tools’, then click ‘Selective’. Place the pin on the mountains. You can increase and decrease the area selected by pinching the screen.
Step 3: Brighten up the person
The background is looking good now, but I am looking a little dull. I used the select tool again to make myself stand out a little more.
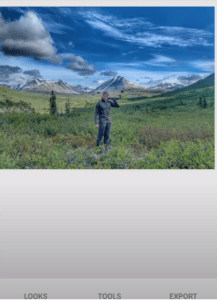
This is the end result of my photo.
I hope this little tutorial was helpful! I have a full tutorial on the Bowmar Bowhunting YouTube channel.
Josh Bowmar
Recent Comments